
Wooden kitchen cabinets are attractive to look at, but they are more likely to harbour one of the most stubborn forms of grime, namely grease. Over a period of time, cooking fumes, oil, and dust accumulate on the wood to form a layer that not only dulls the finish on the wood but also makes it feel grimy. What makes things more complicated is that wood kitchen cabinets are not as tough as they feel. In fact, the finish on them is very thin and can be damaged very easily by using harsh cleaning solutions or too much water. Thus, cleaning them is a very controlled process. It is very much possible to remove grease from wood without damaging the texture or finish on it.
Why does grease build up on wood cabinets
Kitchen cabinets are always exposed to the grease that is suspended in the air and is a product of the cooking process. The grease eventually settles and mixes with dust, fingerprints, and moisture in the air.Eventually, this mixture forms a sticky substance that becomes more difficult to clean if left unchecked. The most affected areas are the ones around the stoves, but even the cabinets that are further away may have a dull and greasy finish.
Start with gentle cleaning methods
When it comes to dealing with wood cabinets, it is important to start with the least aggressive form of cleaning. A dish soap and warm water solution is usually adequate to dissolve grease.A soft material, such as a cloth or sponge, can be dampened lightly and used to wipe the grease. The idea is to allow the solution to dissolve the grease without scrubbing it off.
Tips to remove grease from wood cabinets
Control moisture while cleaning
One of the biggest mistakes that people make while cleaning wood is that they use too much water, which seeps into the finish and harms the wood.The cloth should be damp, not wet, while cleaning the wood. After wiping, each section should be dried immediately with a clean microfiber cloth. This ensures that no moisture is left behind while cleaning.
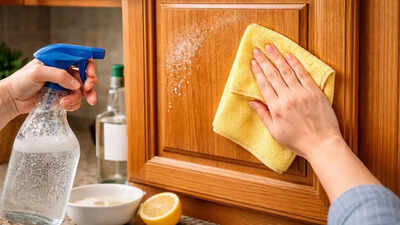
Use vinegar for deeper grease removal
In case the grease buildup does not easily come off, a small quantity of white vinegar may be added to the cleaning solution. Vinegar is acidic in some measure and is therefore effective in breaking down grease buildups.Vinegar, however, should be handled carefully. It should be tested first on a small and inconspicuous area of the surface. It may have a different effect on the surface.
Clean handles and hardware separately
Cabinet handles and knobs may have gathered grime, especially if they are not frequently cleaned. These parts can be cleaned with soapy water and a cloth.If they have lost their shine, a metal polish can be used to bring back their shine. The hinges and hard-to-reach areas can also be cleaned with a cloth to remove grime.
Restore shine without heavy products
After cleaning, the appearance of the cabinets may be clean, yet dull. Applying light conditioning can improve this appearance. Some people apply mineral oil or wood polish, which is suitable, though in small amounts.However, excessive use of polish or oily material may result in residue, which will, in turn, collect more dust and grease, thus defeating the purpose of cleaning.
Avoid common cleaning mistakes
The use of harsh chemicals can be one of the quickest ways to ruin wood cabinets. This can be due to the harsh cleaning solutions, abrasives, and even over-scrubbing, which can strip the finish on the cabinets.Another common blunder is failing to dry the surface of the cabinets. This can result in water spots on the cabinets.
Simple habits to prevent buildup
Regular maintenance may prevent grease from becoming difficult to remove. Light cleaning at regular intervals, especially in heavily used areas, may keep grease buildup in control.Occasionally wiping the cabinets with a slightly damp cloth and drying them immediately may go a long way in maintaining their looks.